The year is 2097. You wake up and take your Cap’n Crunch nutrition capsule. You slide on your skin tight silver uniform and put on your holo display contact lenses. Before you hop on your hover bike to head to the office (yes in the future we all went RTO in the corporate wars of 2048) you pull up the status of the company Microsoft Active Directory domain. All is well. The display shows 17 years of uptime with no issues. Your boss is happy and grants you an additional 30 credits to your cyber-coin wallet.
As you drive into work you reminisce over the dark days. The days when you had to manually patch your domain controllers. The days when Patch Tuesday gave you ulcers and anxiety. Those days are way past you and we have moved on as a society. Is it possible this vision of the future already exists?

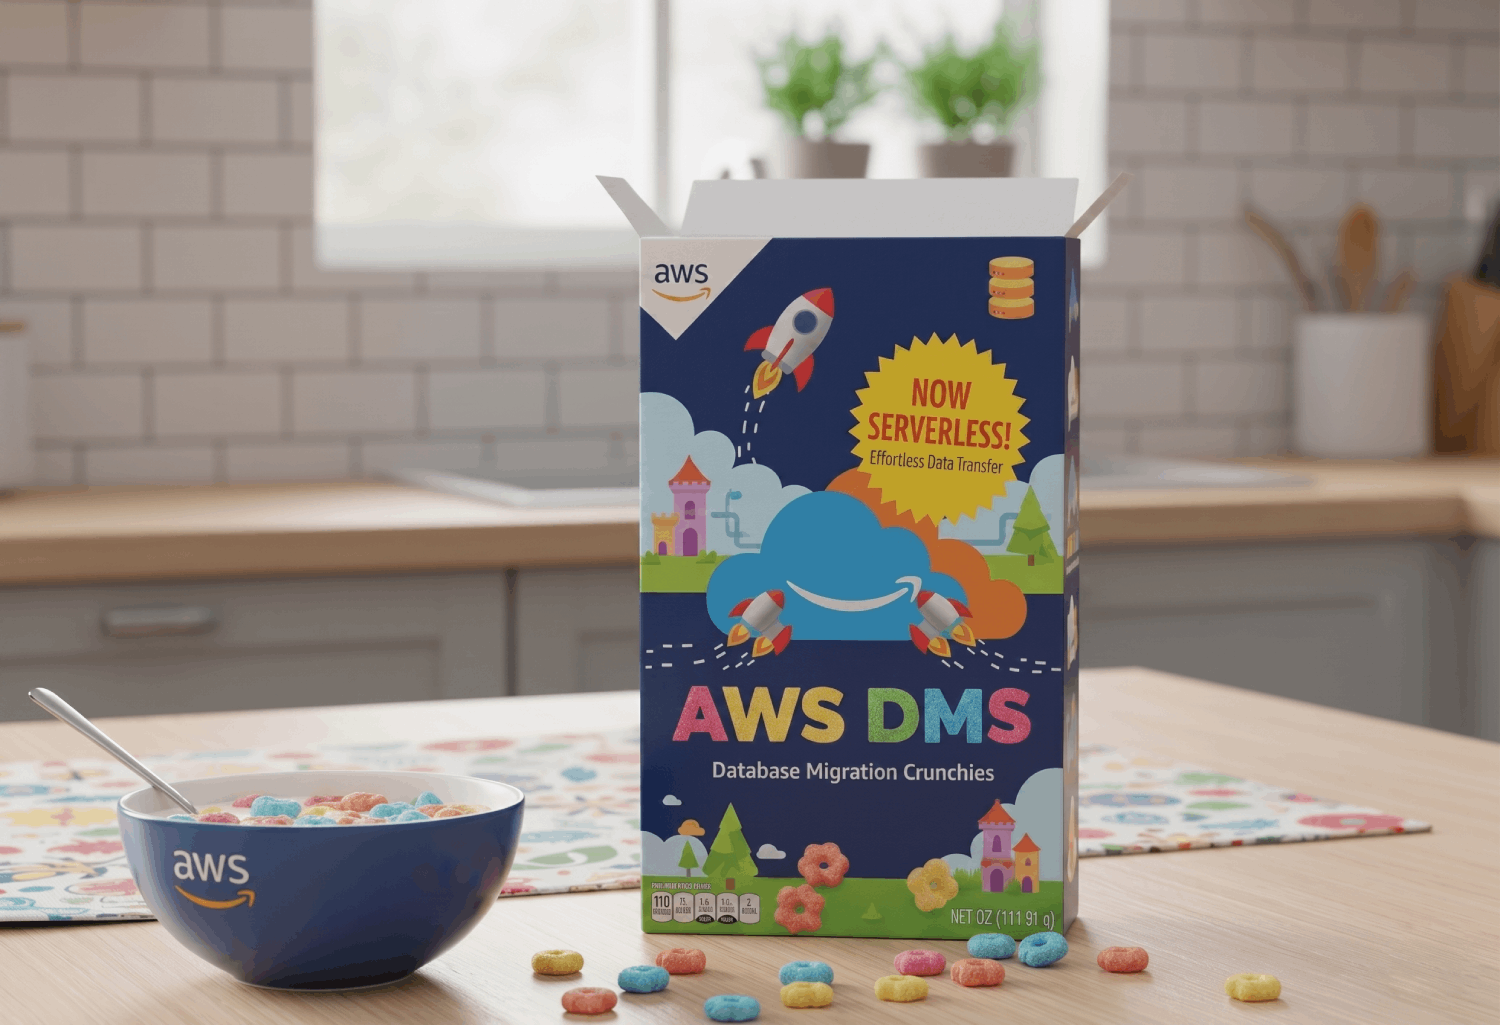
What Is Managed Microsoft AD?
AWS Managed Microsoft AD is a solution in which AWS will provide Active Directory to you as a managed service. This way you can utilize the power of AD without having to worry about the actual management of the servers themselves. Things such as host monitoring, recovery, data replication, snapshots, and software updates are all handled by AWS freeing you up to focus on other tasks. You can host your entire AD setup in the cloud or you can even extend your current self-managed directory into AWS using AWS Managed Microsoft AD (Hybrid Edition)!
Different Editions
AWS currently offers three different editions of this service that you can use. Today we are talking about Standard Edition but please take a quick peek at the table below for some key differences.
| Feature | Standard Edition | Enterprise Edition | Hybrid Edition |
|---|---|---|---|
| Primary Use Case | New Standalone Directory | New Standalone Directtory | Extend Existing Directory |
| Directory Objects | Up To 30,000 | Up To 500,000 | Up To 500,000 |
| Storage Capacity | 1 GB | 17 GB | 17 GB |
| Multi-Region Replication | NO | YES | NO |
Give Me The Ugly Stuff First
OK so to save you a bit of time here in the beginning let’s just go ahead and talk about some of the limitations of the Managed Microsoft AD service and why your particular situation might need to steer clear…
No Domain Admin
The most significant limitation is going to be that you do not get Domain Admin rights in this setup. I assume this is done because the fine folks at AWS know that too many people out there will screw this up (not you or me but we are both thinking of somebody right now) and they would need to add 5,000 additional people to their support staff. We’ll discuss this in more detail further below.
No Direct Host Access
Hey look you said you wanted AWS to manage this crap so that’s what they are doing. Because of that you will not have the ability to directly access the underlying Domain Controllers via RDP, PowerShell Remoting, or SSH. Note that this also means you cannot install any third-party agents (monitoring, security, backup agents, etc.) directly onto the systems.
Other Stuff (Most Of Which Isn’t So Bad)
OK well if you are still reading then I guess that means the previous section didn’t totally scare you off. Before we get into what a basic example of the infrastructure looks like let’s go into specifics about a few more components you need to be aware of:
Versioning
At the time of this writing, when you spin up a new instance of AWS Managed Microsoft AD, your domain controllers will be powered by Windows Server 2019 operating at the 2012 R2 Forest and Domain functional levels.
Domain Admin
When you do things this way you are going to be denied access to some of the traditional accounts / roles and be given others in their place. The most important one is the Admin account. Take note that this account is NOT the traditional, built-in Administrator account. Instead, this is an account that is placed in the AWS Delegated Administrators group.
Other stuff you don’t get access to…
|Administrator Account|This is the traditional Administrator account you are probably used to using. AWS controls this account and rotates it’s password.| |Domain Admins|You cannot add your shiny new Admin account or any other user to this group.| |Enterprise Admins|This group is reserved for and managed by the AWS service.| |Schema Admins|You do not have the ability to modify the schema by default. You can request schema extensions however.|
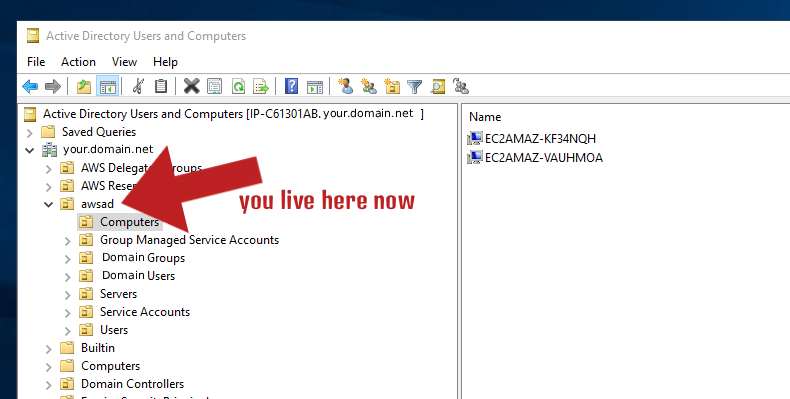
Active Directory / Group Policy
Just like losing access to the traditional Administrator account you will also lose access to many of the higher levels of the OU structure in Active Directory. You cannot create any objects at the root of the domain. Instead, you will be provided your own OU that you have full administrative rights over. Everything you build will start at this OU. You will find if you try to modify or delete any of the default, build in containers or objects that you will be denied.
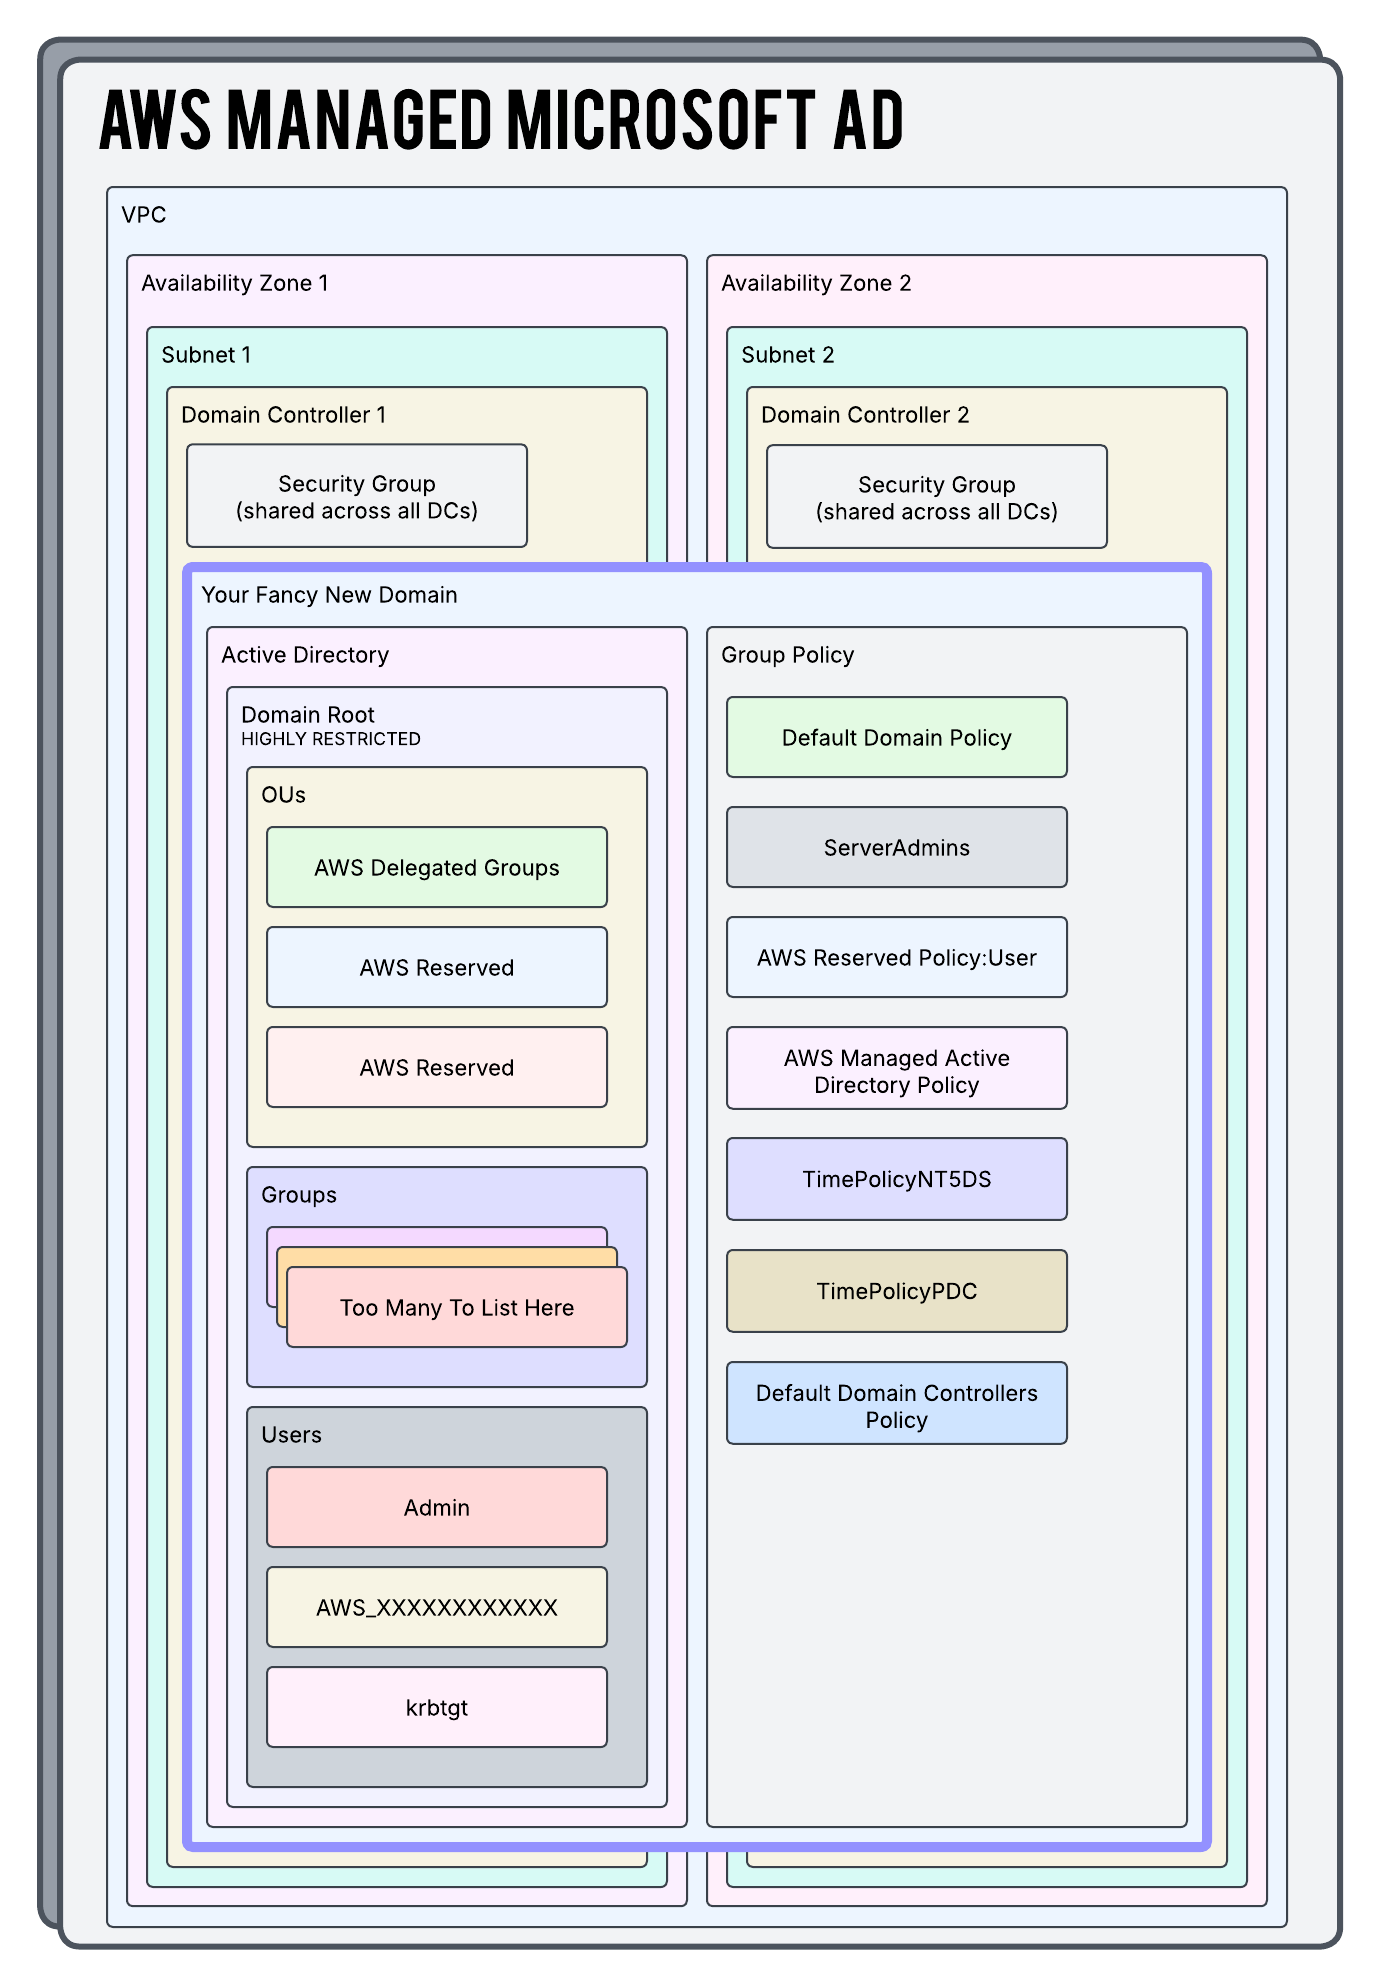
The Whole Picture
So now let’s take a look at a high level overview of what is being built here…
The Terraform
Since this is a serverless solution there is honestly not a lot of configuration needed on our end. Take a peek at the below Terraform configs. You can also view this in my Github repo as well!
providers.tf
We are going to initialize our AWS provider as well as populate our secret key and id so that it knows how to authenticate back to the AWS API.
provider "aws" {
  region  = var.aws_region
  access_key = "ASDFASDFASDFASDFASDFASDF"
  secret_key = "ASDFASDFASDFASDFASDFASDF"
}
terraform.tf
This is where we are going to define some high level configuration around how we want Terraform as a whole to operate. Note here we are calling not only the hashicorp/aws provider but also hashicorp/random as well. The latter is used to generate a random password for our new AD Domain Admin account.
terraform {
  required_version = ">= 1.12"

  required_providers {
    aws = {
      source  = "hashicorp/aws"
      version = "~> 6.4"
    }

    random = {
      source  = "hashicorp/random"
      version = "~> 3.0"
    }
  }
}
ad.tf
Since this is a serverless service with AWS managing most of the nitty gritty for us there’s actually not a lot of information we need to feed in. We’re giving it a name, the edition, where we want it to live in our infrastructure, and a bit more. The rest of the code we are building is primarily just to serve this resource.
# This Is Pretty Much All It Takes To Build This
resource "aws_directory_service_directory" "ad" {
  name     = var.fqdn
  password = random_password.this.result
  edition  = "Standard"
  type     = "MicrosoftAD"

  vpc_settings {
    vpc_id     = data.aws_vpc.vpc.id
    subnet_ids = data.aws_subnets.subnets.ids
  }

  lifecycle {
    ignore_changes = [
      password,
    ]
  }

  tags = {
    Name = var.fqdn
  }
}

# Iterate Through The Local Variable And Build SG Rules Based On That Information
resource "aws_vpc_security_group_ingress_rule" "ad_sg_rules" {
  for_each = local.ad_sg_ingress_map

  security_group_id = data.aws_security_group.aws_managed_dc_sg.id
  cidr_ipv4         = each.value.cidr
  ip_protocol       = each.value.protocol
  from_port         = each.value.from
  to_port           = each.value.to
  description       = each.value.description

}
random.tf
Here we are generating a random value that will be passed into our aws_directory_service_directory resource and used as the password for the provided domain administrator account.
# This Is Going To Generate The Domain Password For The Admin User
resource "random_password" "this" {
  length      = 30
  lower       = true
  min_lower   = 1
  min_numeric = 1
  min_special = 1
  min_upper   = 1
  numeric     = true
  special     = true
  upper       = true
}
secrets.tf
Our random_password resource from above is also going to be stored in a secret so we can view it.
resource "aws_secretsmanager_secret" "secret" {
  description             = "Managed Secret For AWS Managed AD Domain Password"
  name                    = "${var.environment}-domain-password"
  recovery_window_in_days = 7
}

resource "aws_secretsmanager_secret_version" "example" {
  secret_id     = aws_secretsmanager_secret.secret.id
  secret_string = random_password.this.result
}
locals.tf
In this file we are defining a set of objects that represent all of the protocols we need to allow through our Security Group (that is automatically assigned to our new Domain Controllers). Then, below that, we are using further logic to smush it all together (including the values in var.ad_sg_ingress_cidrs) to make a map object that is ultimately used by the security_groups.tf file further down.
locals {
  # These Are All The Ports Needed For AD To Function
  ad_sg_ingress_ports = [
    {
      description = "NTP",
      protocol    = "udp",
      from        = 123,
      to          = 123
    },
    {
      description = "RPC",
      protocol    = "tcp",
      from        = 135,
      to          = 135
    },
    {
      description = "SMB (UDP)",
      protocol    = "udp"
      from        = 445
      to          = 445
    },
    {
      description = "DNS (UDP)"
      protocol    = "udp"
      from        = 53
      to          = 53
    },
    {
      description = "NetBIOS Datagram Service"
      protocol    = "udp"
      from        = 138
      to          = 138
    },
    {
      description = "ICMP"
      protocol    = "icmp"
      from        = -1
      to          = -1
    },
    {
      description = "LDAP (UDP)"
      protocol    = "udp"
      from        = 389
      to          = 389
    },
    {
      description = "LDAP (TCP)"
      protocol    = "tcp"
      from        = 389
      to          = 389
    },
    {
      description = "DNS (TCP)"
      protocol    = "tcp"
      from        = 53
      to          = 53
    },
    {
      description = "Kerberos Password Change (TCP)"
      protocol    = "tcp"
      from        = 464
      to          = 464
    },
    {
      description = "LDAPS"
      protocol    = "tcp"
      from        = 636
      to          = 636
    },
    {
      description = "Kerberos (TCP)"
      protocol    = "tcp"
      from        = 88
      to          = 88
    },
    {
      description = "Kerberos (UDP)"
      protocol    = "udp"
      from        = 88
      to          = 88
    },
    {
      description = "Kerberos Password Change (UDP)"
      protocol    = "udp"
      from        = 464
      to          = 464
    },
    {
      description = "SMB (TCP)"
      protocol    = "tcp"
      from        = 445
      to          = 445
    },
    {
      description = "RPC"
      protocol    = "tcp"
      from        = 1024
      to          = 65535
    },
    {
      description = "Global Catalog"
      protocol    = "tcp"
      from        = 3268
      to          = 3269
    }
  ]

  # Combine All Rules And CIDR Ranges Into A Giant Map
  ad_sg_ingress_map = merge([
    for cidr in var.ad_sg_ingress_cidrs : {
      for rule in local.ad_sg_ingress_ports : "${cidr}|${rule.protocol}|${rule.from}|${rule.to}" => {
        cidr        = cidr
        description = "${rule.description} from ${cidr}"
        protocol    = rule.protocol
        from        = rule.from
        to          = rule.to
      }
    }
  ]...)

}
security_groups.tf
So here you can see we are taking the map object we built above and using for_each to build out all of the Security Group rules. Be mindful of the Security Group Rule quota because this can easily get you to that default limit.
# Iterate Through The Local Variable And Build SG Rules Based On That Information
resource "aws_vpc_security_group_ingress_rule" "ad_sg_rules" {
  for_each = local.ad_sg_ingress_map

  security_group_id = data.aws_security_group.aws_managed_dc_sg.id
  cidr_ipv4         = each.value.cidr
  ip_protocol       = each.value.protocol
  from_port         = each.value.from
  to_port           = each.value.to
  description       = each.value.description

}
data.tf
Here are a few pieces of existing infrastructure we are looking up so we can reference them and then use them in our build.
# Look Up The Existing VPC We Are Going To Build In
data "aws_vpc" "vpc" {
  tags = {
    Name = var.vpc_name
  }
}

# Look Up The Existing Subnets We Are Going To Build In
data "aws_subnets" "subnets" {
  filter {
    name   = "tag:Name"
    values = var.subnets
  }

  filter {
    name = "vpc-id"

    values = [
      data.aws_vpc.vpc.id
    ]
  }
}

# Look Up The Security Group Assigned To The Domain Controllers
data "aws_security_group" "aws_managed_dc_sg" {
  filter {
    name   = "tag:Name"
    values = [aws_directory_service_directory.ad.name]
  }
}
variables.tf
An assortment of values we are holding in variables so we can easily migrate this build to other environments. Remember that in variables.tf we are purely defining the existence and structure of our variables. We are not assigning values to them yet.
variable "aws_region" {
  description = "AWS region identifier for created resources."
  type        = string
}

variable "environment" {
  description = "The environment in which we are deploying the infrastructure."
  type        = string
}

variable "subnets" {
  description = "The subnet names in which to deploy the AD infrastructure."
  type        = list(string)
}

variable "vpc_name" {
  description = "The VPC name in which to deploy the AD infrastructure."
  type        = string
}

variable "fqdn" {
  description = "The fully qualified name for the directory/connector."
  type        = string
}

variable "ad_sg_ingress_cidrs" {
  description = "The list of CIDR ranges we want to add to the ingress rules of the AWS Managed AD Security Group."
  type        = set(string)
}
terraform.tfvars
And here is where we are assigning actual values to the variables we have created above.
aws_region = "us-east-1"

environment = "dev"

vpc_name = "dev-vpc"

fqdn = "ad.yourdomain.net"

subnets = [
  "dev-subnet-a",
  "dev-subnet-b"
]

# Set Of All The CIDR Ranges We Want To Be Able To Talk To Active Directory
ad_sg_ingress_cidrs = [
  "10.4.0/16",
  "172.5.0.0/16"
]
In Conclusion
So hopefully this gave you some good context around what setting up this service might look like. Obviously there are many ways you can stand up or expand Active Directory across your environment and things can get way juicier than what we did here today. You can find tons of other information in the official AWS Docs around this service.

Start the conversation